|
xTuple ERP Reference Guide |
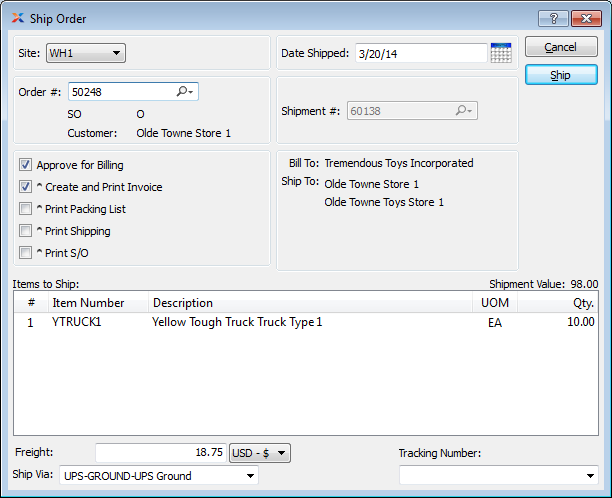
To ship an Order, select the "Ship Order" option. The following screen will appear:

Before an Order can be shipped successfully, Sales Account and Receivables Assignments for the specified Customer must be in place.
When Shipping an Order, you are presented with the following options:
Specify the Site you are shipping from.
Specify the date you shipped the Order.
Enter the Order Number of the Order you want to ship. The browse button located to the right of the field leads to a searchable list of Orders available for Shipping.
Displays the Shipment Number.
Specify this option to approve the Sales Order for Billing as soon as it is shipped. If selected, the Order will appear on the Billing Approvals list—making it available to be converted into an Invoice. This option will be selected by default if specified in your system-level configuration. This option will be disabled if a Transfer Order is specified.
Specify this option to automatically create and print an Invoice for the Sales Order as soon as it is shipped. Selecting this option enables you to bypass the Billing Selection process. Once the Order is shipped, an Invoice will be created and printed. This Invoice will appear on the list of unposted Invoices—making it available for posting. By default, the "Select for Billing" option will also be selected. This option will be disabled if a Transfer Order is specified.
If the Customer specified on the Sales Order has an EDI Profile attached, you may encounter an EDI processing interface when printing the Invoice.
Specify this option to automatically print a Packing List as soon as the Order is shipped.
Select to print the Shipping Form.
Select to print a copy of the Sales Order.
Select if you want the Transfer Order to be received automatically at the Destination Site as soon as the Order is shipped. If this option is not used, Transfer Order Items must be received manually at the Destination Site. This option will be disabled if a Sales Order is specified.
The system will move Transfer Order Items to the specified Transit Site when the Order is shipped. If the Order is marked to be received immediately, the system will then receive Inventory at the Destination Site.
Displays the name of the Customer to be billed for the Sales Order.
Displays the appropriate Ship-To Address.
If your site integrates UPS WorldShip with the system, you should process Orders in WorldShip after they have been issued to Shipping—but before they have been shipped.
Display lists Order Line Items available for Shipping.
Displays the value of the Items being shipped. The shipment value represents the total of the extended prices for all Items included in the Shipment. The amount does not include freight or Tax.
Enter the amount of freight charge to be added to the specified Order. Freight charges may be entered during the creation or modification of an Order—or at the time of shipment.
The system supports up-to-date shipment tracking with links to the websites of many leading shipping companies (i.e., "Ship Vias").
Specify the Ship Via for the Order. The Ship Via field supports free-form Ship Vias. If you want to enter a free-form Ship Via, simply type the name of the Ship Via into the field.
Get the most up-to-date tracking information directly from the shipper's website by using the "Query Shipment Status" option found in the "Shipments by Sales Order" report. This feature is enabled for a limited number of shipping companies (i.e., "Ship Vias")
Tracking Numbers associated with an Order may be viewed in the Shipments by Sales Order report.
The following buttons are unique to this screen:
Ships the Order, clearing the screen of previously-displayed data.
If an Order is marked "Ship Complete," you will be prevented from shipping the Order until all Line Item quantities are issued to Shipping.