
|
xTuple ERP Reference Guide |
|
|
xTuple ERP Reference Guide |
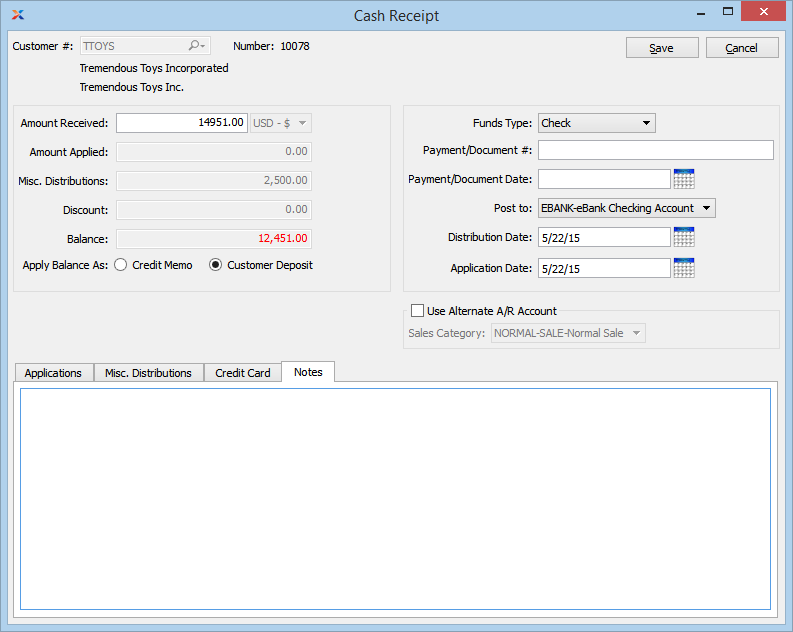
Cash Receipts may be applied to either an open Invoice or an open miscellaneous Debit Memo. To enter a Cash Receipt, select the "Enter Cash Receipt" option. The following screen will appear:

When entering a Cash Receipt, you are presented with the following options:
Enter the Customer Number of the Customer whose Cash has been received. The lookup feature located to the right of the field leads to a searchable Customers list. You may also access this list using the keyboard shortcut "CTRL + L". Once a Customer Number is entered, the Customer name and billing address will display. Select the "?" or "$" symbol to view Customer information for the specified Customer. If a Customer's credit is "In Good Standing," the button will feature a black question mark ("?") icon. If the icon turns to an orange dollar sign ("$"), the Customer's credit Status is "On Credit Warning." A red dollar sign ("$") indicates the Customer's credit Status is "On Credit Hold."
If you receive an overpayment from a Customer, you can go ahead and apply the full Payment to an Invoice—even if the amount exceeds the Invoice amount. In these cases, the system will automatically generate an unapplied Credit Memo for the Customer, in the overpayment amount.
Specify the amount of Cash received from the Customer.
Displays the amount of Cash that has been applied to the specified Customer's Invoice(s).
Displays the amount of any miscellaneous distribution(s).
Displays the amount of any Discounts given when cash is applied to open Receivables inside the billing Discount period for those items.
Displays the difference between the amount to be applied and the amount applied.
If your system is configured to enable Customer Deposits, you may select one of the following options for applying any unapplied Cash Receipt balance:
If the distribution date for the Cash Receipt precedes the application date, the label "Apply Balance As" will change to "Record Receipt as" to clarify that the cash will be recorded as a Credit Memo or Customer Deposit until the application date arrives. On the application date, the Credit Memo or Customer Deposit will automatically be applied to its specified receivable document(s).
Select to treat the unapplied balance as a miscellaneous Credit Memo, which may be applied to open Receivables at a later time.
Select to treat the unapplied balance as a Customer Deposit. The Deferred Revenue Account specified on the Receivables Account Assignments screen will be used. A Credit Memo will also be created, allowing the Customer Deposit to be applied to open Receivables at a later time.
Specify the type of the Cash Receipt. Choose from following Funds Types (the corresponding letter code for each is also shown): Check (C), Certified Check (T), Cash (K), Wire Transfer (W), and Other (R). If you are using xTuple's Credit Card processing functionality at your site, the following additional Funds Types options will be available: Master Card (M), Visa (V), American Express (A), Discover Card (D), Other Credit Card (O).
If a Credit Card is being used and your site is configured to process Credit Cards from the system, then you must select a valid Credit Card using the "Credit Card" tab below. The charge transaction will begin processing once you select the SAVE button.
You can use the Funds Type "Other" for entering Credit Card information if you are not using xTuple's Credit Card processing functionality at your site.
Use this field to enter the Customer's Payment Number, transaction number, Credit Card number, or any other Document Number associated with the Cash Receipt.
Use this field to specify the date on the payment you received. This is the Document date used when running the Receivables aging report.
Select the Bank Account you want to post the Cash Receipt to. The Asset Account used for the selected Bank Account is specified on the Bank Account master.
If your site uses a unique Bank Account for receiving Credit Card payments, make sure to select the appropriate Bank Account when entering payments from a Credit Card.
Specify the date of the cash distribution. This is the date the Cash Receipt will hit the General Ledger (G/L). By default, the current day's date will appear. If the distribution date precedes the application date, the label "Apply Balance As" will change to "Record Receipt as" to clarify that the cash will be recorded as a Credit Memo or Customer Deposit until the application date arrives. On the application date, the Credit Memo or Customer Deposit will automatically be applied to its specified receivable document(s).
Specify the date you want the cash to be applied to the selected receivables. By default, the current day's date will appear. To prevent Receivable aging and G/L balance mismatches, you may not enter an application date prior to the earliest document date of receivables the cash is being applied to.
When using an alternate Exchange Rate, the system will calculate and display the gain/loss based on the difference between the system level Exchange Rate and the alternate Exchange Rate. A General Ledger transaction will be created and the gain/loss will be posted to the appropriate account. The gain/loss amount will be displayed and posted in the Base Currency.
Enter the alternate Exchange Rate in this field.
The system will display the gain/loss in this field.
The fields for using the Alternate Exchange Rate will only be available if the "Alternate Exchange Rate on Cash Receipt" option has been selected in Accounting Setup under Accounts Receivable.
Select one of the following optional Receivables Accounts:
Specify a Sales Category whose Receivables Account option you want to use instead of the default Receivables Account.
If an alternate Receivables Account is not specified, the system will use the default Receivables Account specified for the Customer Type under Receivables Account Assignments.
To search for an Invoice in the Open Items display, begin typing an Invoice Number into this field. As you type, the list will automatically scroll toward the Invoice Number you are typing. You can also search for Invoices manually by scrolling through the list.
Select to include Credit Memos in the list of open Receivables. If shown, Credit Memos may be applied to a Customer's open balance in the same way the Cash Receipt amount is applied—that is, using any of the available application buttons on the screen. This feature gives you the option of consuming open credits before cash is applied.
Display lists open Receivables (i.e., Invoices and Debit Memos) for the specified Customer.
The following buttons are unique to this screen:
If your site is configured to process Credit Cards from the system, the charge transaction will begin processing when you select the SAVE button.
Highlight an open Item and then select this button to apply an amount to an individual open Item.
Highlight an open Item and then select this button to apply cash to the balance for the line. This will all cause any eligible Discounts to be applied.
Highlight an open Item and then select this button to remove any amount applied toward the open Item.
Select to apply the available balance to open Receivables. If the applied balance exceeds the amount due on an open Item, the remaining balance will be applied to the next open amount. This will all cause any eligible Discounts to be applied.
You may disable the APPLY TO BALANCE button for your site if you wish, by selecting the appropriate option in the system-level configuration.
If you need to distribute all or some portion of the amount to a miscellaneous General Ledger account click on the Misc. Distributions and the following screen will appear:

The following buttons are unique to this screen:
Select to add a miscellaneous distribution.
If a Customer is paying with a Credit Card, select the "Credit Card" tab to specify which Credit Card to use. The following screen will appear:

Once all the required information has been entered and a valid Credit Card has been selected, the charge transaction will begin processing when you select the SAVE button.
When selecting a Credit Card to use for processing a Cash Receipt, you are presented with the following options:
Display lists Credit Card information for the specified Customer.
The following buttons are unique to this screen:
Highlight a Credit Card and then select this button to move the Credit Card up in the sequence of Credit Cards. Sequence numbers are automatically adjusted to reflect the change in position.
Highlight a Credit Card and then select this button to move the Credit Card down the sequence of Credit Cards. Sequence numbers are automatically adjusted to reflect the change in position.
Enter the Card Verification Value (CVV) Code found on the back of the specified Credit Card. This may be an optional feature at your site. Contact your Systems Administrator for details.
To add Notes to a Cash Receipt, select the "Notes" tab. The following screen will appear:
When entering Notes related to a Cash Receipt, you are presented with the following options:
This is a scrolling text field with word-wrapping for entering Notes related to the Cash Receipt. Notes entered here may be viewed later on the Cash Receipts report screen.
To apply a Cash Receipt to an individual open Receivable, select the APPLY button. The following screen will appear:
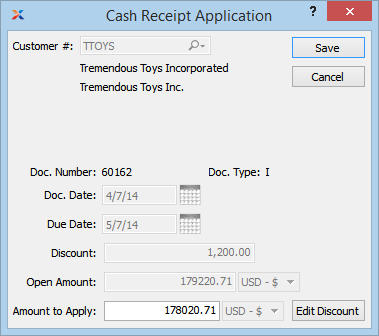
You will not be able to post a Cash Receipt if the amount applied is greater than the Cash Receipt total.
When applying a Cash Receipt to an individual open Item, you are presented with the following options:
Displays the Customer Number of the Customer selected on the previous screen. The Customer name and billing address will also display. Select the "?" symbol to view Customer information for the specified Customer.
Displays the Document Number associated with the Item.
Displays the Document Type of the Document.
Displays the Document's origination date. In the case of a Sales Order, the Document date is the date when the Sales Order is created.
Displays the date payment is due. In the case of a Sales Order, billing terms are defined in the Sales Order master.
Displays the amount of any Discount given when cash is applied to an open Receivable inside the billing Discount period for that item.
Displays the amount due for the open Item.
Specify the Cash Receipt amount to apply to the open Item. You may not apply more than the open amount.
The following buttons are unique to this screen:
Select to edit the Discount amount for the selected open Receivable.
Discounts are applied automatically when using the APPLY LINE BAL. or APPLY TO BALANCE buttons. However, you may have cases where you want to manually enter or override a Discount amount. When editing the Discount for an open Receivable, you are presented with the following screen:

When editing the Discount for an open Receivable, you are presented with the following options
Displays the name of the Customer whose open Receivable you are applying cash to.
Displays the Document Type. Valid Document Types include posted Invoices and miscellaneous Receivables Debit Memos.
Displays the Document Number of the Document you are applying cash to.
Displays the Document's origination date.
Displays the billing Terms selected at the time the Document was posted.
Displays the expiration date for the billing Terms Discount period. The Discount date will display in red type once the Discount period has expired. Once the Discount period has expired, the system will no longer automatically update the Discount amount field.
Displays the Discount percentage, as specified in the billing Terms.
Displays the total amount from the original Document.
Displays the amount of any Discounts previously applied to the selected Document.
Enter the amount of the Discount to be applied to the total owed. As long as the Discount period has not expired, the system will automatically calculate the Discount amount for you. The Discount amount will be equal to the total owed multiplied by the Discount percentage. The Account used for posting Discounts to the General Ledger (G/L) is defined on the Receivables Account Assignments screen.
To add a miscellaneous distribution, select the ADD button. The following screen will appear:

When adding a miscellaneous distribution, you are presented with the following options:
Select an Account for the miscellaneous distribution.
Specify the amount to distribute to/from the specified Account.
This is a scrolling text field with word-wrapping for entering Notes related to the miscellaneous distribution.
If your system is configured to use Credit Cards, the "Credit Card" tab will be visible. This tab will not be visible if your system is not configured to use Credit Cards.