|
xTuple ERP Reference Guide |
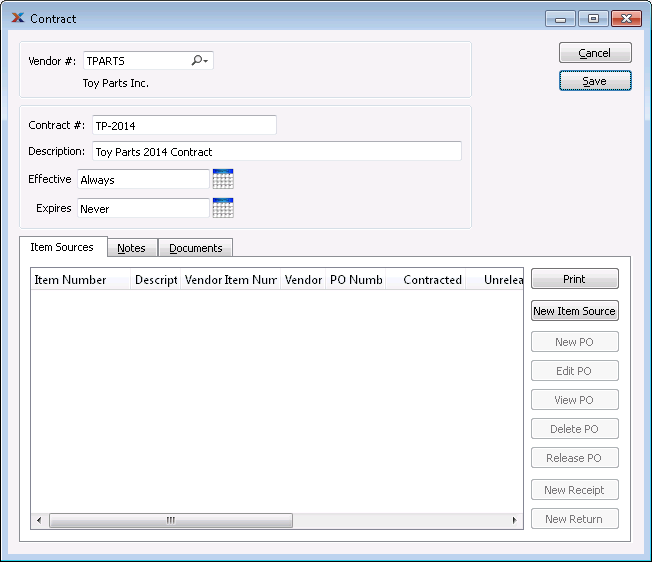
To create a new Contract, select the "New Contract" option. The following screen will appear:

Create New Contract
When creating a new Contract, you are presented with the following options:
Enter the Vendor number for the Contract.
Enter a number to identify the Contract.
Enter a description for the Contract.
Enter the first date on which the Contract will be valid.
Enter the last date on which the Contract will be valid (e.g., the date the Contract expires).
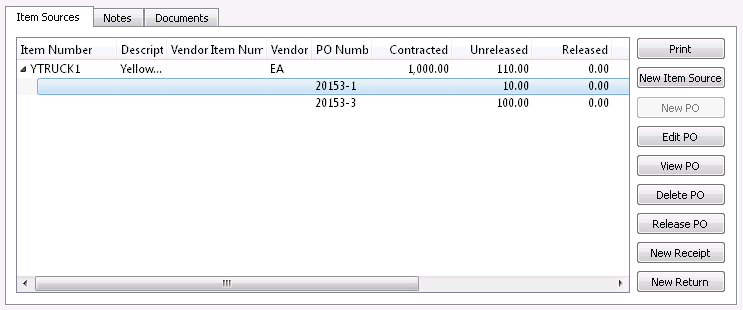
To view or enter Item Sources for a Contract, select the Item Sources tab. The following screen will be displayed:

Contract Item Sources
When viewing Item Sources for a Contract, you will be presented with the following options:
Display lists existing Contract Items and Item Sources.
To see Purchase Orders for an Item Source, click the arrow to the left of the Item. To open the Item Source, double-click on the Item Source line.
Select PRINT to print a list of the Contract Item Sources.
Select this option to enter a new Item Source. Detailed information on adding a new Item Source is available under the section Section 9.1, “Enter New Item Source”.
Select this option to create a Purchase Order under this Contract. Detailed information on adding a new Purchase Order is available under the section Section 2.1, “Enter New Purchase Order”
If a Purchase Order already exists under the Contract, you can specify that you want to use the existing Purchase Order―or create a new Purchase Order.
.
Highlight a Purchase Order and then select this option to make changes to the Purchase Order.
The Contract Item Source line must be expanded in order to highlight the relevant Purchase Order. Once that is done, the buttons for working with the Purchase Order will be enabled.
Highlight a Purchase Order and then select this option to view the selected Purchase Order.
Highlight a Purchase Order and then select this option to delete the highlighted Purchase Order.
Highlight a Purchase Order and then select this option to release the selected Purchase Order without leaving the Contract window.
Highlight a Purchase Order and then select this option to enter a new Purchase Order Receipt.
Highlight a Purchase Order and then select this option to enter a Purchase Order return.
To enter notes for the Contract, select the Notes tab. The following will be displayed in the window:
Contract Notes
The area in the Notes tab can be use to enter information about the Contract.
To attach documents to the Contract, select the Documents tab. The following will be displayed in the window:
Contract Documents
When associating documents, you are presented with the following options:
Select to create a new document and associate it with the current record. You may create the following document types:
Select to create a new Image association.
Select to create a new Fixed Asset association.
Select to create a new Maintenance Order association.
Select to create a new Incident and associate it.
Select to create a new Project and associate it.
Select to create a new Opportunity and associate it.
Select to create a new To-Do and associate it.
Enables you to edit associated documents. The edit screen is the same as that for creating a new document—except that when editing, the fields will contain document information. Double-clicking on a document will also bring you to the editing screen.
Highlight a document and then select this button to reach a read-only view of the "Edit" screen
Select to associate already-existing documents. The following document types may be attached: Contact, Account, Customer, Employee, File, Image, Incident, Item, Opportunity, Project, Purchase Order, Sales Order, Vendor, Web Site, Work Order.
Highlight a document and then select this button to remove the association.
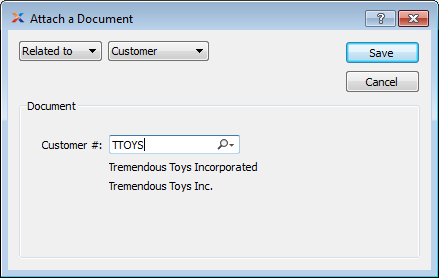
To associate already-existing documents, select the ATTACH button. The following screen will appear:

When associating already-existing documents, you are presented with the following options:
Indicate how the document is related to the current record. The following relationship options are available: Related to, Parent of, Child of, Duplicate of.
Specify the kind of document you want to associate. The following document types may be attached: Contact, Account, Customer, Employee, File, Image, Incident, Item, Opportunity, Project, Purchase Order, Sales Order, Vendor, Web Site, Work Order. When associating Files, you will also be given the option to save the File to the database.
There is no file size restriction when saving Files to the database. However, excessively large files could cause storage and performance issues.
Use the lookup field to identify the specific document you want to attach. The data entry options will vary depending on the document type you select.