
|
xTupleCommerce Product Guide |
|
|
xTupleCommerce Product Guide |
| 14.5.2. Dealer Types | ||
|---|---|---|
 | 14.5. Managing the Dealer Map |  |
You have the option of creating "dealer types," as a way to offer users an additional method for filtering map results. To do this, navigate to the area of the Dealer Map page.
Let's say, for example, your dealers fall into four basic categories:
Domestic
International
Retail
Distribution
All you need to do is link these user-defined dealer types to existing customer types from the ERP. Once the link is made, the dealer types will become a filter option on your dealer map. The connection between dealer types and customer types is made using the XML template found on the Types section of the Dealer Map page, as shown in the following screenshot:
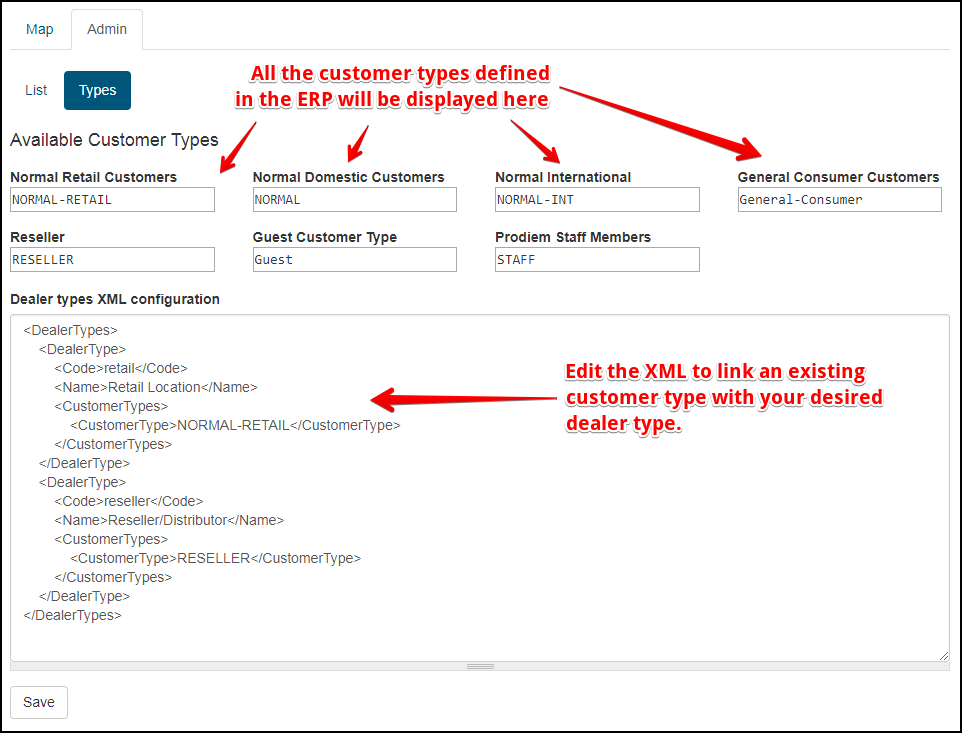
Dealer types XML template
Editing the XML template to add your own dealer types is relatively easily. However, if you prefer, feel free to hand this task over to your IT staff member or xTuple technical representative. Either way, here are descriptions of the main components you will find in the XML template:
This is the beginning of the template. All your dealer types information will be entered between this and the closing tag </DealerTypes>.
This tag opens the entry for a new dealer type. All information between this tag and the closing </DealerType> tag constitutes the information needed to create a dealer type filter.
To add multiple dealer types, simply repeat these steps by adding a new section beginning with the <DealerType> tag and ending with the </DealerType> tag. Be sure to include all the same required information in between
Enter an internal code to help you identify the dealer type. This code will not be shown to end users, but can be helpful when managing your site. Be sure to close this tag with the </Code> tag.
Enter the public-facing name of the dealer type. This name will act as the label for the dealer type on the dealer map. Be sure to close this tag with the </Name> tag.
This tag opens the section where you link an existing ERP customer type with your new dealer type. This section will be closed by the </CustomerTypes> tag.
Enter here the name of the existing ERP customer type you want to link to. Because these customer types are displayed already on this page, you can simply copy/paste the desired customer type into this line. Be sure to close the entry with the </CustomerType> tag.
Once you click the button, the dealer type filters you've created will appear on your dealer map. By default, the map will present all dealer types as selected. The following screenshot shows a dealer map with sample dealer type filters enabled:

Dealer map with dealer types enabled
| |  | |
| 14.5.1. Dealer List |  | 14.5.3. Update |