xTuple Connect can import CSV and XML files. It can even contact FTP servers to download those files and them import them. It should be noted that the xTuple Connect import facilities are not yet as diverse as the data export capabilities.
Importing Data with xTuple Connect has two phases:
Copy files from a remote FTP server to a local directory
Import files to the xTuple database from a local directory
Since these are distinct steps in the import process, contacting the FTP server is optional. Any files placed in the right directory can be imported automatically. If you regularly receive CSV or XML files by email, you can set up xTuple ERP and xTuple Connect once, then drop the files where the xTuple Connect Batch Manager can find them whenever they arrive.
When xTuple Connect is installed and enabled, the Configure Import and Export screen shows a "Transfer Information From" list on the "Import Settings" tab. To set up xTuple Connect to retrieve files from an FTP server, you add the FTP server to this list:
Follow this path:
Click on the "Import Settings" tab
Click on the NEW button next to the "Transfer Files From" list
You will see the Import Source screen that looks like this:
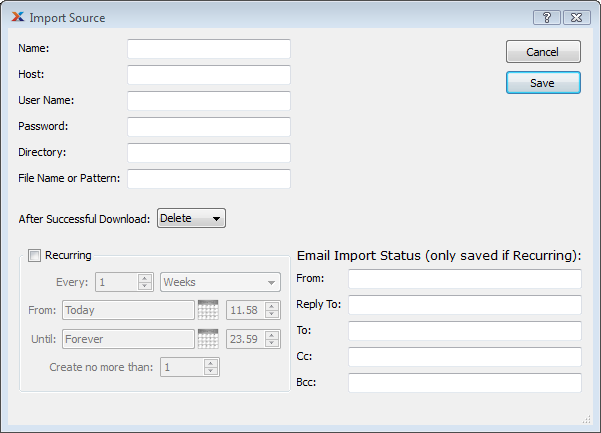
Defining an Import Source
Enter a name you can use to remember this Import Source
Enter the host name or IP address of the FTP server you will download files from
Enter the user name and password given to you by the FTP server administrator
Enter the directory from which you will download files (this might be empty)
If the names of the files you will be downloading all have some pattern in common, such as containing the name of your company, enter that pattern in the "File Name or Pattern" field (e.g.
.*Prodiem.xml)Tip
See http://www.xtuple.org/PatternMatching for information on regular expressions.
If you want to do something to the files on the FTP server after the download is complete, select from the "After Successful Download" options (this only affects the FTP server, not your local copy of the files, and gives you a mechanism for not downloading the same file from the FTP server more than once)
Check the Recurring box and enter how frequently you want to download files from this Import Source, what date and time you want to start, and what date and time you want to stop
On the right-hand side of the screen, enter email information the xTuple Connect Batch Manager can use to let you know what files have been downloaded
Note
If the Recurring box is not checked, the email information will not be saved. Without a recurring event, the Import Source will never be used. The email information is part of the xTuple Connect Batch Manager job, not the Import Source.
Click the SAVE button
Note
It is important to remember that this is the schedule for downloading files. The download job does not import the files into the database. Downloading files from FTP servers and importing them into the xTuple database are distinct steps and are scheduled independently.
This distinction lets you retrieve files from different FTP servers on schedules that might be determined by your business partners, but import the data into your database when you want to.
Before xTuple Connect can import files, you must set up CSV Atlases for CSV files or XSLT Mappings for XML documents. See the xTuple ERP Reference Guide and http://www.xtuple.org/DataImportTool for more information on these configuration steps.
Once the CSV and XML import are configured, you can schedule the xTuple Connect Batch Manager to check the default import directory on a regular basis. The xTuple Connect Batch Manager will then try to import any .xml and .csv files it finds. Here are the steps to create this import schedule:
Follow this path:
Click on the "Import Settings" tab
Click on the "Schedule Imports" tab
Check the Recurring box and enter the import schedule
On the right-hand side of the screen, enter email information the xTuple Connect Batch Manager can use to let you know what files have been imported
Click the SAVE button