Report definitions are structured documents used to extract data from a database and then print that data on one or more pages. The report writer gives you the ability to define simple or complex structures. In this section, we will look at the parts of a report definition.
Report definitions created using the report writer consist of three basic sections. Those three sections are as follows:
- Headers
Headers are frequently used for titles, column headings, and key report information—such as Customer contact information on an Invoice. Headers may contain queries, but unlike the Detail sections of a report, Headers will only display the first row returned for a query.
- Footers
Footers often contain summary data—such as totals.
- Detail Sections
Detail sections typically contain the core information found in a report. Detail section information is typically represented in the form of multiple rows of values that were returned by a query.
To add sections to or remove sections from a report definition, use the section editor. To access the section editor, open a report definition and select the “Section Editor” option from the “Document” drop-down menu. The following screen will appear:
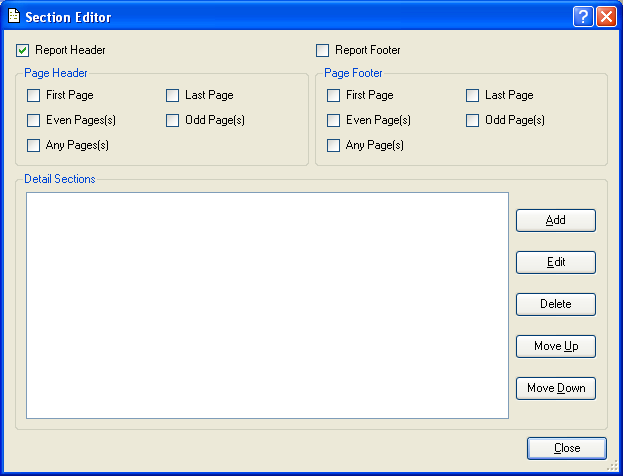
As you can see, the section editor contains controls for each of the three basic section types. In the following examples, we will discuss all the controls found on the section editor screen.
Report Headers are commonly used to create report titles. Report Headers have the following characteristics:
Always print on the report
Always print at the top of the page, directly below Page Headers
Directly precede first Detail section
Only print on the first page
Only display the first row of data returned by a query
For the purposes of this exercise, we will assume we are working with a blank report definition having no sections currently defined. To add a Report Header to a report definition, select the “Report Header” option from the section editor screen. The Report Header section will be added to the report definition, as shown in the following screen:

When a section is added to a report definition, the name of the section appears in the upper-left-hand corner of the section. As you can see, our newly-added section is clearly labeled “Report Header.”
To remove a Report Header from a report definition, simply uncheck the “Report Header” option on the section editor screen.
Page Headers are commonly used to contain column headings. Page Headers have the following characteristics:
Always print at the top of a page
Always contain the first information printed on a page
Directly precede Report Headers
Only display the first row of data returned by a query
Allow multiple types for different pages
Only one allowed per page
To accommodate the requirements of multi-page reports, the report writer supports the following five different types of Page Headers:
- First Page
Prints at the top of the first page of a report
- Even Page(s)
Prints at the top of even pages of a report
- Any Page(s)
May be used to print at the top of any page of a report
- Last Page
Prints at the top of the last page of a report
- Odd Page(s)
Prints at the top of odd pages of a report
Again, only one Page Header may be printed per page. When a report definition contains more than one Page Header, the report writer recognizes the Page Headers in the following order of precedence: 1) First Page; 2) Last Page; 3) Even Page(s); 4) Odd Page(s); 5) Any Page(s).
Tip
If your report definition includes both “Even Page” and “Odd Page” Page Headers, don’t include an “Any Page” Header. Based on the report writer’s precedence rules, the “Any Page” Header would never print in this scenario.
To add a Page Header to a report definition using the section editor, select the type of Page Header you want to add from the “Page Header” section of the screen. For this exercise, we will add a first Page Header, as shown in the following screen:
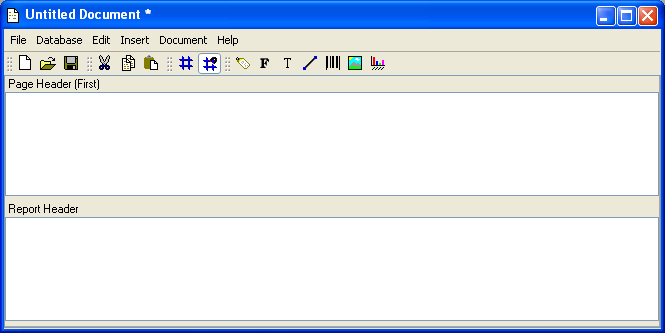
As you can see, the Page Header section is added above the Report Header section. If subsequent Page Header sections are added, they will also be placed above the Report Header section, but below the “First Page” Header.
To remove a Page Header from a report definition, simply uncheck the Page Header option you selected on the section editor screen.
Report Footers are commonly used to display report totals. Report Footers have the following characteristics:
Always print on the report
Always print at the bottom of the page, directly above Page Headers
Directly follow the last Detail section
Only print on the first page
Only display the first row of data returned by a query
To add a Report Footer to a report definition, select the “Report Footer” option from the section editor screen. The Report Footer section will be added to the report definition, as shown in the following screen:
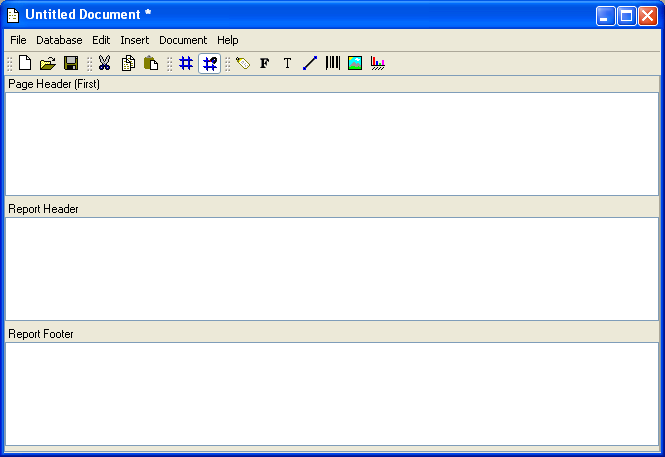
As you can see, the Report Footer section is added below the Report Header section. To remove a Report Footer from a report definition, simply uncheck the “Report Footer” option on the section editor screen.
Page Footers are commonly used to contain report totals. Page Footers have the following characteristics:
Always print at the bottom of a page
Always contain the last information printed on a page
Directly follow Report Footers
Only display the first row of data returned by a query
Allow multiple types for different pages
Only one allowed per page
To accommodate the requirements of multi-page reports, the report writer supports the following five different types of Page Footers:
- First Page
Prints at the bottom of the first page of a report
- Even Page(s)
Prints at the bottom of even pages of a report
- Any Page(s)
May be used to print at the bottom any page of a report
- Last Page
Prints at the bottom of the last page of a report
- Odd Page(s)
Prints at the bottom of odd pages of a report
Again, only one Page Footer may be printed per page. When a report definition contains more than one Page Footer, the report writer recognizes the Page Footers in the following order of precedence: 1) Last Page; 2) First Page; 3) Even Page(s); 4) Odd Page(s); 5) Any Page(s).
Tip
If your report definition includes both “Even Page” and “Odd Page” Page Footers, don’t include an “Any Page” Footer. Based on the report writer’s precedence rules, the “Any Page” Footer would never print in this scenario.
To add a Page Footer to a report definition using the section editor, select the type of Page Footer you want to add from the “Page Footer” section of the screen. For this exercise, we will add a first Page Footer, as shown in the following screen:
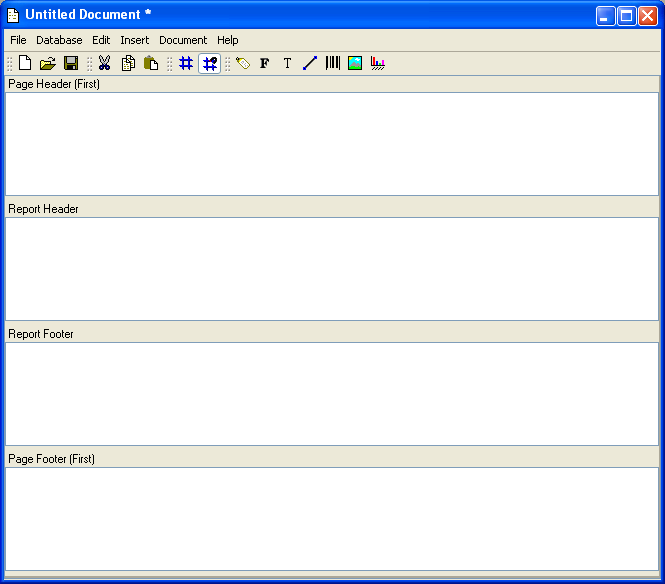
As you can see, the Page Footer section is added below the Report Footer section. If subsequent Page Footer sections are added, they will also be placed below the Report Footer section, but above the “First Page” Footer.
To remove a Page Footer from a report definition, simply uncheck the Page Header option you selected on the section editor screen.
The core information in a report is displayed in its Detail section. Detail sections have the following characteristics:
Generally print in the middle of a page
Always contain the core information for a report
Display multiple rows of data returned by a query
Unlimited allowed
Note
The report writer allows you to incorporate an unlimited number of Detail sections into a report definition, although most contain just one.
The section editor handles Detail sections differently than it handles Header and Footer sections—that is, the process for adding and managing Detail sections is more involved. The following screen shows the section editor with a Detail section added:
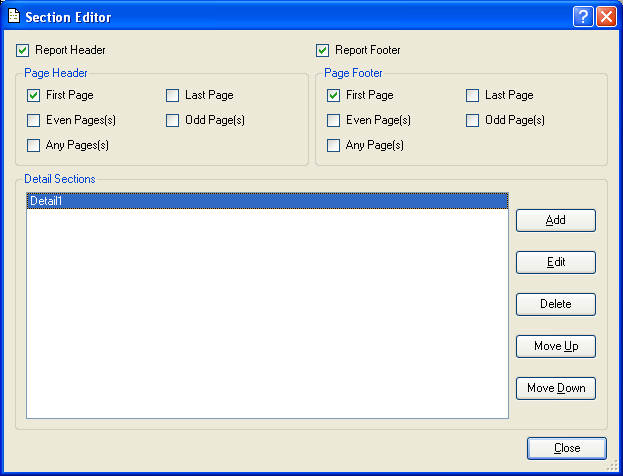
When adding a Detail section to a report definition, you are presented with the following options:
- Detail Sections
Displays the names of Detail sections added to the report definition. Detail sections may be added, edited, removed, or moved up and down.
To the far right of the screen, the following buttons are available:
- ADD
Opens screen for adding a new Detail section to the report definition, as described below.
- EDIT
Enables you to edit highlighted Detail section. The edit screen is the same as that for adding a new Detail section—except that when editing, the fields will contain Detail section information.
- DELETE
Highlight a Detail section and then select this button to remove the Detail section from the list.
- MOVE UP
Highlight a Detail section and then select this button to move the Detail section up the list.
- MOVE DOWN
Highlight a Detail section and then select this button to move the Detail section down the list.
- CLOSE
Closes the screen, returning you to the application desktop.
To add a new Detail section to a report definition, select the ADD button. The following screen will appear:
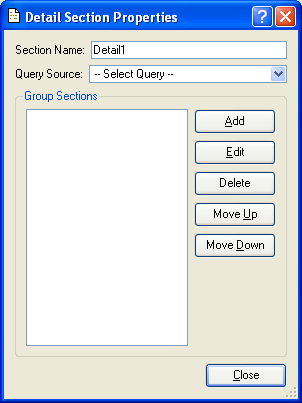
When adding a new Detail section to a report definition, you are presented with the following options:
- Section Name
Enter a name to identify the Detail section.
- Query Source
Select a query source from the drop-down menu by clicking on the arrow to the right of the field. Query sources are used to populate report definition objects with dynamic data from the database the report writer is connected to.
Note
For more information on query sources and the link between database fields and report definition objects, please see the Getting Started chapter.
- Insert Page Break At End of Last Section
When this option is checked a new page will be started when the section is complete. Additional detail sections and/or a report footer is printed on a new page. Page footers will print as normal.
- Group Sections
Displays the names of Group sections added to the report definition. Group sections may be added, edited, removed, or moved up and down.
To the far right of the screen, the following buttons are available:
- ADD
Opens screen for adding a new Group section to the report definition, as described below.
- EDIT
Enables you to edit highlighted Group section. The edit screen is the same as that for adding a new Group section—except that when editing, the fields will contain Group section information.
- DELETE
Highlight a Group section and then select this button to remove the Group section from the list.
- MOVE UP
Highlight a Group section and then select this button to move the Group section up the list.
Tip
The Group section appearing at the top of the list is considered the first, or outermost Group section. During processing, the outermost section is handled first, followed by the next innermost section, and then the next innermost, etc.
- MOVE DOWN
Highlight a Group section and then select this button to move the Group section down the list.
Tip
The Group section appearing at the top of the list is considered the first, or outermost Group section. During processing, the outermost section is handled first, followed by the next innermost section, and then the next innermost, etc.
- CLOSE
Closes the screen, returning you to the application desktop.
When a Detail section has been added using the section editor, the report writer incorporates the Detail section into the report definition, as shown in the following screen:
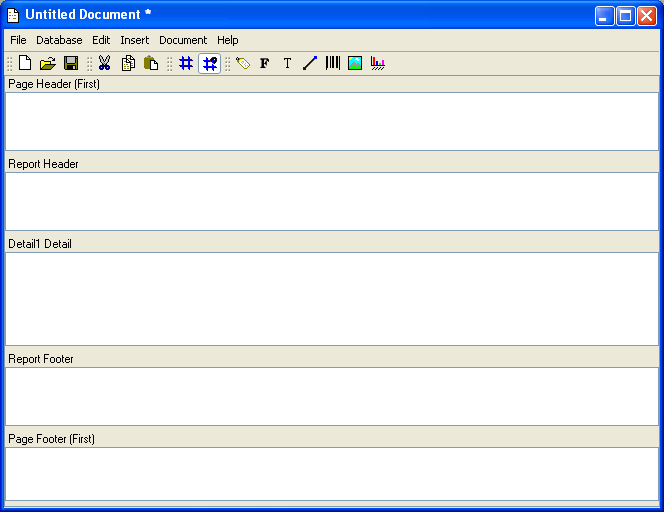
As you can see, the Detail section has been added to the report definition. The Detail section appears in the middle of the page, sandwiched between the Report Header and Report Footer.
While most reports can be defined using a single Detail section having multiple columns and rows of data, others require summary data—such as subtotals. For reports requiring summary data, the report writer supports Group sections. Group sections have the following characteristics:
Always associated with Detail sections
Defined by Group Headers and Group Footers
Group Headers always print above Detail sections
Group Footers always print below Detail sections
Reference database column on which Group Headers and Group Footers will break
Force new Group Header each time the value of the referenced column changes
Force a new Group Footer each time the value of the referenced column changes
Unlimited allowed
To add a Group section to a report definition, select the ADD button from the “Detail Section Properties” screen. The following screen will appear:
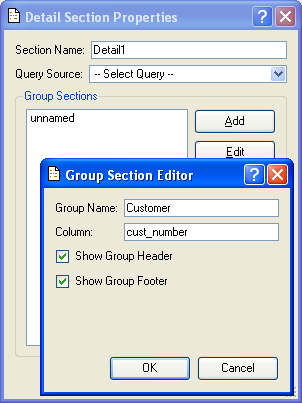
When adding a Group section to a Detail section, you are presented with the following options:
- Group Name
Enter a name to identify the Group section.
- Column
Specify the name of the database column you want to use from the selected query source. A query source may refer to multiple columns in its
SELECTstatement. By indicating a specific column, you instruct the query source to return data only for that specified column. Other columns appearing in theSELECTstatement will be ignored.Note
For more information on query sources and the link between database fields and report definition objects, please see the Getting Started chapter.
- Show Group Header
Select to include a Group Header in the report definition. The Group Header will print above the Detail section. If not selected, no Group Header will be included in the report definition.
Tip
Be sure to specify a Group Header and/or a Group Footer. Without either, no Group section will print on the report definition.
- Show Group Footer
Select to include a Group Footer in the report definition. The Group Header will print below the Detail section. If not selected, no Group Footer will be included in the report definition.
- Insert Page Break After this Footer
When checked starts a new page before the next grouped section. When this option is checked and a group is ending a page break will be created after the group footer, if any. The current record will be moved forward after the current page is completed rendering but before the next page starts rendering.
At the bottom of the screen, the following buttons are available:
- OK
Select to save your settings.
- CANCEL
Closes the screen without saving any changes, returning you to the application desktop.
When a Group Header and Group Footer have been added using the section editor, the report writer incorporates both sections into the report definition, as shown in the following screen:
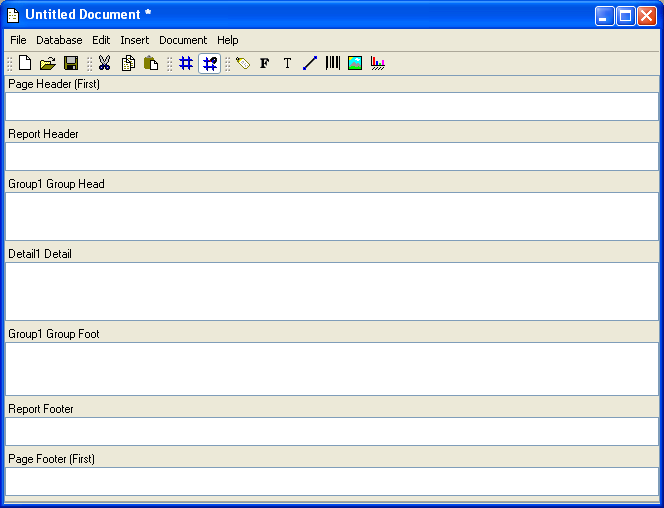
As you can see, the Group Header has been added above the Detail section, and the Group Footer has been added below the Detail section.
To better understand the relationship between Detail sections and Group Headers and Group Footers, let’s look at a sample report generated from data in an xTuple Database. The following Sales Analysis report is called “Time Phased Sales History by Customer by Item”:
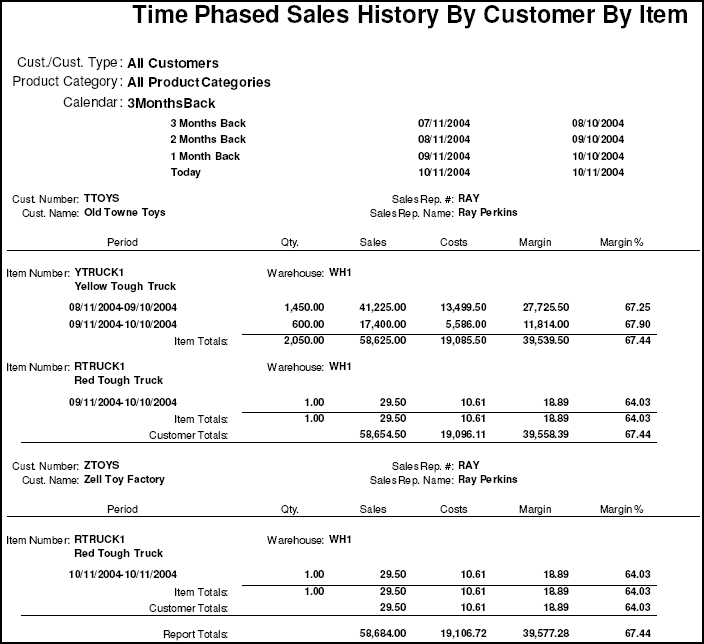
The “Time-Phased Sales History by Customer by Item” report contains a Detail section with two Group sections associated with it. The outermost Group section refers to Customer information. The second, innermost Group section refers to Item information. Basically, if you study the report you will see that the sections are printed in the following descending order:
Group Header (Customers
Group Header (Items
Detail Section (Dates/Amounts)
Group Footer (Items)
Group Footer (Customers)
Because the report contains data for two Customers, you can see in the screenshot that the sequence of sections repeats itself twice. You can also see that Group Footers are used to provide both Item and Customer subtotals. As we mentioned earlier, Group sections are commonly used for summary information.
Note
Group Headers and Group Footers are powerful features which enable you to generate reports which provide multiple levels of detail and roll-up values. However, you will find that most report definitions will conform to the following basic structure:
Page Header: Any Page(s)
Detail Section
Page Footer: Any Page(s)
The report shown is the actual report printed from data in an xTuple Database. The following screenshot shows the report definition used to generate the sample report.
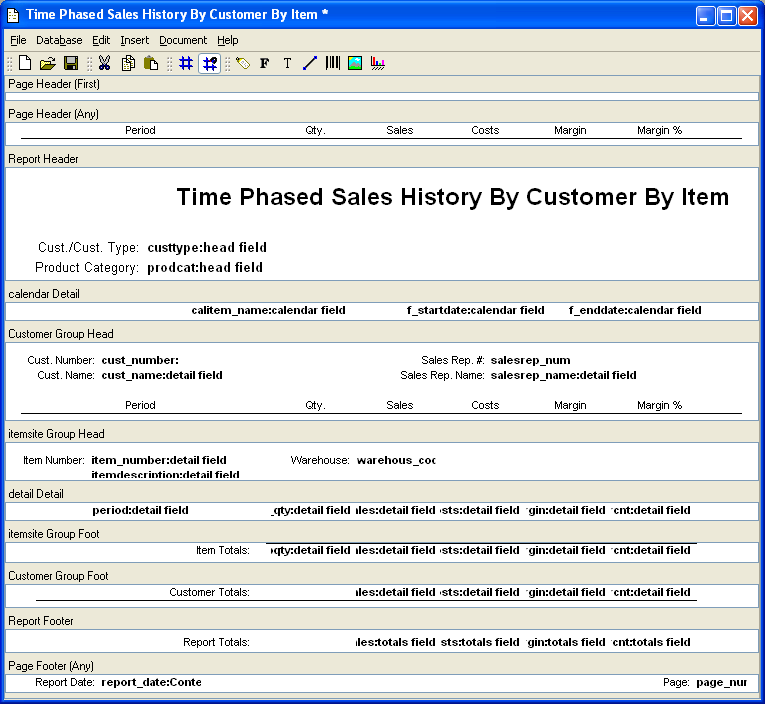
If some aspects of the report definition shown seem confusing, don’t worry. We will be covering the mechanics of report writing in subsequent chapters