This example shows how to set up an EDI Profile to send FTP. This transport mechanism requires less information than sending email, so entering the basic information shared by all document types and EDI recipients is simple. Start by following these steps:
Follow this path:
Click the NEW button
In the "Name" field, enter "Sales_FTP_CSV"
Leave the "EDI Type" set to "FTP"
Check the "Review Before Sending" box
In the "Server" field, enter "</ftpserver>"
In the "Login Name" field, enter "</ftplogin>"
In the "Password" field, enter "</ftppassword>"
In the "Directory" field, enter "</ftpdirectory>"
This uses four replacement tokens that are not part of the standard set. You cannot just enter a host name or IP address in the Server field because each Customer will have its own FTP server. The same is true of user names, passwords, and directories. We'll create a set of Customer Characteristics later in Section 3.1, “Creating Customer Characteristics for FTP” to handle this. For now we'll use that idea as we create the EDI Forms for the different document types.
We'll start with the Quote. To add an EDI Form for Quotes to our Sales_FTP_CSV profile, follow these steps:
Click the NEW button on the EDI Profile window
When the application asks if you would like to save the EDI Profile, click OK
The EDI Form window will open
Set the "Document Type" to "Quote"
Set the "Output Format" to "CSV"
In the "File Name" field, enter "</doctype></docnumber>.csv"
SELECT (SELECT charass_value
        FROM charass JOIN char ON (charass_char_id=char_id)
        WHERE charass_target_type='C'
          AND charass_target_id=cust_id
          AND char_name = 'ftpserver') AS ftpserver,
       (SELECT charass_value
        FROM charass JOIN char ON (charass_char_id=char_id)
        WHERE charass_target_type='C'
          AND charass_target_id=cust_id
          AND char_name = 'ftplogin') AS ftplogin,
       (SELECT charass_value
        FROM charass JOIN char ON (charass_char_id=char_id)
        WHERE charass_target_type='C'
          AND charass_target_id=cust_id
          AND char_name = 'ftppassword') AS ftppassword,
       (SELECT charass_value
        FROM charass JOIN char ON (charass_char_id=char_id)
        WHERE charass_target_type='C'
          AND charass_target_id=cust_id
          AND char_name = 'ftpdirectory') AS ftpdirectory
FROM quhead JOIN custinfo ON (quhead_cust_id=cust_id)
WHERE (quhead_id=<? value("docid") ?>);
Leave the "Delimiter" set to ","
The query above searches through the Characteristics settings for the Customer associated with the Quote being sent. It creates and sets the values for the four custom tokens we entered on the EDI Profile window.
Next we need to put in place the queries that will create the header and detail lines. We composed these in Section 1.1, “Quotes” but need to put them where the application can find them. To do so, follow these steps:
Click the NEW button on the EDI Form window
The EDI Form Detail window will open
In the "Name" field, enter "header"
Leave the "Order" set to "0"
In the "Query" field, enter the SELECT statement from the api.quote view (see Section 1.1, “Quotes”)
Click the OK button
Click the NEW button again to create a second EDI Form Detail
In the "Name" field, enter "detail"
In the "Order" field, enter "1"
In the "Query" field, enter the second SELECT statement we composed in Section 1.1, “Quotes” from the api.quoteline view and the screen should look like this:
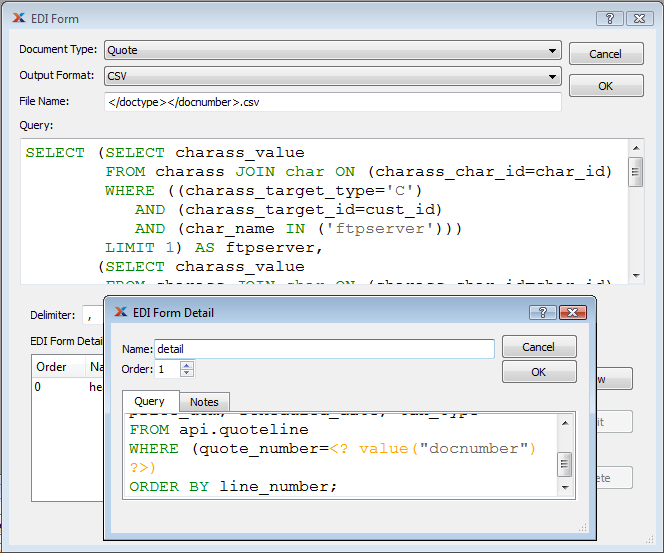
EDI Form Detail for Quote Lines
Click the OK button
Our EDI Profile is now set up to handle Quotes. We have to follow the same steps again to add Sales Orders. There are a few things you have to do differently:
Make sure the Document Type is set to "Sales Order"
When you enter the query on the EDI Form window, replace "quhead" with "cohead" three times on the last two lines
When you enter the "header" and "detail" queries on the EDI Form Detail window, use the queries we defined in Section 1.2, “Sales Orders” instead of the queries for Quotes
For Invoices we have to do all of this yet again. When you are finished, the EDI Profile window should look like this:
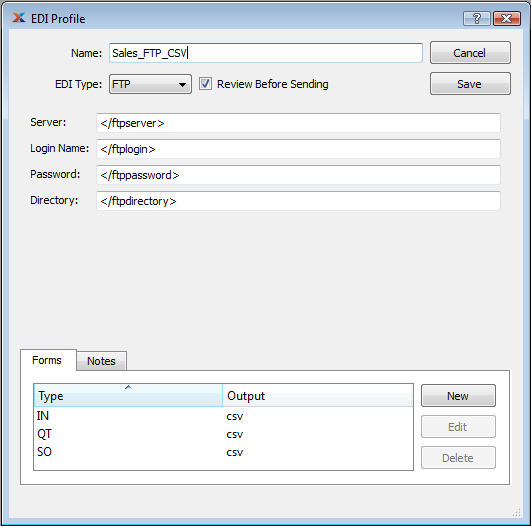
EDI Profile window for an FTP profile shared by Quotes, Sales Orders, and Invoices